
 If you have a guy (young or old-er) who has a birthday around this time, what better theme to play on than football?! And what's even better, Spaceships & Laserbeams, who created the table showcased above, has done all the homework for you! First, they designed all the printables, including banner, water bottle labels and circle tags shown. You can buy the printables from their etsy shop here. All you need to do is print, cut and display. They also outlined everything you need to recreate this table in your own home--from groceries to display items. And even if it's not a birthday, use the ideas to add some serious style to your Super Bowl party! To get all the details, and see the rest of the photos, jump here.
Monday, January 31, 2011
Merry Monday: A Super Football Birthday
If you have a guy (young or old-er) who has a birthday around this time, what better theme to play on than football?! And what's even better, Spaceships & Laserbeams, who created the table showcased above, has done all the homework for you! First, they designed all the printables, including banner, water bottle labels and circle tags shown. You can buy the printables from their etsy shop here. All you need to do is print, cut and display. They also outlined everything you need to recreate this table in your own home--from groceries to display items. And even if it's not a birthday, use the ideas to add some serious style to your Super Bowl party! To get all the details, and see the rest of the photos, jump here.
Friday, January 28, 2011
Top it With Love
 If you need some inspiration for Valentine's Day, there's no better place to turn to than wedding blogs. And with weddings becoming more DIY, the wedding blogs are bursting with great ideas. One of my favorites is Luna and Chloe Weddings. Kristi Delfino has a great ability to take one little detail or item, and turn it into a big idea. I have been saving this little nugget for Valentine's Day. How romantic is this LOVE cake topper made simply from yarn and fabric stiffner? And do you see the little heart at the bottom left? Wouldn't it be adorable on a cupcake? Or how about 4 cupcakes with the letters L-O-V-E across them? There are so many ways to use this little idea and turn it into something big. To find the how-to for this and other ideas she has with yarn, see Luna and Chloe Weddings' original post here.
Thursday, January 27, 2011
New Use For Old Sweaters
As snow continues to pound on many areas, most of us are looking for ways to create a cozy environment inside. If you want to do some re-decorating as you're spending that time indoors–look to your closet! Grab those old sweaters (or buy some cheap at Goodwill) and use them to add warmth and coziness to your living room and bedroom with these great ideas. You can also use these ideas as romantic Valentine's Day gifts or for a winter themed get-together.


Wednesday, January 26, 2011
Popcorn Cupcakes
 I've been seeing these "pop" up in quite a few parties lately, that I wanted to share how to make these ultra-adorable popcorn cupcakes. They are perfect for a carnival, sleepover or movie night themed party. Make it as a cupcake or one big cake. They'll add to your party's decor and are sure to catch everyone's attention! To make these, here is a great tutorial from Stephanie Lynn at Under the Table and Dreaming.
Tuesday, January 25, 2011
DIY Peppermint Sugar Scrub
 In yesterday's post I mentioned that we made a Peppermint Sugar Scrub during our "spa party." This is so easy--only a few ingredients, smells great and very easy on the skin.
What You Need:
- 1 cup sugar
- 1/3 cup olive oil
- 1 drop of Peppermint Pure Essential Oil (I found mine for about $5 in a natural grocery store) Essential Oil will take you a lot further than the "oils" you find in craft stores

Monday, January 24, 2011
Merry Monday: Spa Party
A couple of weeks ago, I had the pleasure of hosting a spa party for some gal pals from the MOMS Club I belong to. And I have to say–fun was had by all! Here are some photos of the night. Make sure to read the details about the massage therapist we had and tips–ideas you may want to use with your friends one night. (Excuse the poor photography. It was at night, red room and all I have is a pocket digital camera!)


- Some girly flip flops invited guests right in as soon as they got to the door to set the mood
- You'll see more photos of the table below, but here is the center of the table. When I was thinking about the tablescape I knew I wanted to incorporate water to give a spa-like feeling, and filling the cylinder vases did the trick.
- I created standing letters out of foam core board and leftover Christmas scrapbook paper to remind all the moms why they were there–and not to think about their little ones at home.

- One of my favorite details on the table was the loofah on the center vase. It really almost looked like a flower on the table!
- For the cylinder vases, I just added one drop of green food coloring to the water. I purchased one bunch of flowers at the Dollar Store (one bunch gave me six flowers for $1), and using kitchen shears, cut the stems off. A couple of tips for you: Positioning the cylinder vases diagonally into the table, instead of just lining them up along the back, allows you to fill up the table when you're not serving too much. Second: Fake flowers do not float. So, I used mini glue dots to hold the flowers in place at the top of the vases, just giving the illusion that they're floating on the water. Party styling magic!

- Since this was later in the evening, I kept the menu light. I served cheese and crackers, cucumber cups topped with hummus, and margherita glasses filled with grapes and kiwi. And no ladies night is complete without chocolate: a dark chocolate chex mix, Andes candies and white chocolate covered pretzels--all keeping with my green color scheme.
- If you look closely at the cucumbers, you may notice that they're set on ice. This is a great tip Kim of Party Frosting reminded me about. If you need to keep something cold during a party, fill a tray with water and scatter in some fruit. In this case, I used sliced lemons (since it went with my spa theme; Kim used cranberries for her table... here) Freeze it and it makes a really nice presentation that'll keep your food cold. *Make sure to only freeze it for about 4 hours or so. If you freeze it overnight, you'll get horrible bumps and cracks because water expands when it's frozen. Also make sure to use a pan that can handle extreme tempertures. I used a glass Pyrex baking dish. Lastly, I set a pane of glass over the ice to avoid the cucumbers from getting soggy if the ice melted during the night. (I have a small wine stand I popped the pane of glass out of, but you could use anything clear)

- I wanted to hang strings of bath beads from the room's chandelier, but could not find them anywhere! Are they just old school now?? So, I used a beaded garland I had that were meant to be reminiscent of bath beads.
- I arranged for a massage therapist to be at the party. I set up a private area where people could get their massage done. We each got a 10-minute massage. It was so great to get the kinks out from being on the computer all week! I set up a table in the room with a CD player and some Enya, a small basket of towelettes and hair ties. These lit branches I bought on a Christmas sale set the perfect mood for those getting a massage done.
- While we waited for our massages, we made peppermint sugar scrubs. I'll share the recipe with you tomorrow.
Friday, January 21, 2011
DIY Candy Dispenser
 My friend Sarah and a group of other friends came over last week for a "spa party" (you're going to see the photos on Monday). Look at what she brought me! How adorable is this candy dispenser that she made from a mason jar and tin chicken feeder?? I had to share! Perfect as a centerpiece for a party or any get-together. This WAS filled with chocolates, but the danger of this cute dispenser, is that it makes the goodies go extra quickly!
 Sarah followed the directions here to make it. I believe she used "rub-ons" instead of stickers--the possibilities are endless. Thanks Sarah!
Thursday, January 20, 2011
Home Decor Swap Party
We moved into our house over five years ago. And as is the usual problem with moving into a new space, a lot of the stuff we brought with us doesn't quite fit in the house. We don't have nearly as many shelves, so we have a lot of knick knacks boxed up, unhung artwork, etc. If you have a lot of boxed-up miscellaneous items, including old party goods, a swap party is a fun way to get rid of them. And if "getting organized" is one of your new year resolutions, this is the perfect time to do it! Here are a few tips to putting together a Home Decor Swap Party. Start off by sending guests an invitation that sets the tone for the party. I found these cute "Let's Swap" tags (above left) you can download free here. At right, I love how Christi of P is for Party gave her Swap Party invites a boutique feel, so people didn't feel like they were going to a garage sale. And she went the extra step of customizing bags with labels for guests to hold their things. Although her's was a clothing swap party, the bags are still a good idea to hold small items like candles.
 Other Tips:

 Start off by sending guests an invitation that sets the tone for the party. I found these cute "Let's Swap" tags (above left) you can download free here. At right, I love how Christi of P is for Party gave her Swap Party invites a boutique feel, so people didn't feel like they were going to a garage sale. And she went the extra step of customizing bags with labels for guests to hold their things. Although her's was a clothing swap party, the bags are still a good idea to hold small items like candles.
 Other Tips:
- Make sure you have enough tables set up. I would recommend at least three tables where people can display their items. Vases and framed items can be propped on the floor.
- Let people mingle for the first half hour while items are being set up. Then distribute numbers to all guests. The number determines when they get to "shop." Out of consideration, a person should only take the number of items they came with. Whatever is leftover can be donated. You can have guests pick a number out of a hat or I love Christi's idea–she made the tree above right. Guests picked an envelope with a number inside off the tree. Makes the tree functional and a nice party decoration.

- Give guests stickers with their names on them, or use this cute clothespin idea, to let them "mark" their items.
- Finally, anytime you have any sort of get-together, you need to serve food. Serve easy, non-messy finger foods that guests can eat quickly while they "shop."
For more tips on throwing a swap party, as well as photo sources, click on the following links:
Wednesday, January 19, 2011
Rainbow Cupcakes
 Add some fun color to a cold, gray day with one of these rainbow cupcakes! The different colors are sure to wow kids and make them fun to eat.
These would also be perfect for a Wizard of Oz party, art party or just a rainbow-themed party.
Get the recipe and directions here.
Tuesday, January 18, 2011
DIY Wine Glass Lampshades
 Looking to give your party tables a bistro feel? Or wanting to add a romantic glow to your dinner table besides candles? This will do the trick! The Pretty Blog gives you a template to make these cute lampshades for your wine glasses that you can customize however you wish. I suggest using battery operated tea lights in the wine glasses. Hop on over here to get the how-to and template.
Monday, January 17, 2011
Merry Monday: LOVE ROCKS V-day Party
I fell in love with this party the minute I saw it! Love the theme, and the kids look like they had a blast! (It may also have something to do with the fact that I wanted to be a rock star growing up! ha) Designed by Natalie of Southern Belle's Charm, with the help of some talented ladies, this party absolutely rocks with vibrant and fun details. Check it out!


 One of my favorite details is the custom temporary tattoo, purchased from Buttonhead here. You can purchase the same printables used for this party (that includes the invitation shown at top) from Frog Prince Paperie here. The small "LOVE ROCKS" cupcake banners were designed by Piggy Bank Parties; cupcakes are from Retro Bakery. This is just the "opening act" -- see the full lineup of amazing details with shopping sources at Southern Belle's Charm blog here. Rock on!


 One of my favorite details is the custom temporary tattoo, purchased from Buttonhead here. You can purchase the same printables used for this party (that includes the invitation shown at top) from Frog Prince Paperie here. The small "LOVE ROCKS" cupcake banners were designed by Piggy Bank Parties; cupcakes are from Retro Bakery. This is just the "opening act" -- see the full lineup of amazing details with shopping sources at Southern Belle's Charm blog here. Rock on!
Friday, January 14, 2011
DIY: Photo Wood Blocks
 I'm always looking for creative photo gifts to send our family on the East coast. And when it's a gift I can possibly make, that's even better. I love these photo wood blocks from A Yummy Mommy. Not only do they make a great gift, the blocks make a playful decoration for your bookshelf, window sill or mantle. Plus, you can swap out the letters to reflect the seasons: "Give Thanks", "Celebrate Family", etc. You could even use this idea for a block-themed baby shower or birthday party, "Turning One." Go to a Yummy Mommy here for the how-to.
Thursday, January 13, 2011
Award Worthy Snacks
I still look forward to watching the Golden Globes each year. It's definitely one of the most fun to watch--not just to see what everyone's wearing--but because most of the attendees are already sloshed by the time they get on stage! Who can forget Jack Nicholson's "butt cheek" acceptance speech (a la Jim Carey)?! And there always seems to be one winner stuck in the bathroom when they call her name! And yes, I watch the red carpet specials all the way to the end of the awards ceremony. Being on Mountain Time, that thankfully doesn't mean staying up until midnight. If you plan to watch this coming Sunday night, or better yet–getting some friends together to watch–here are a few great items to help you enjoy the star-studded event.
 Since it is the Golden Globes, anything round is a must: truffles, doughnut holes, cake balls. Don't these shimmery sugar coated doughnut holes look yummy? Source here.
And since it is an awards show you need some sparkle. Dust edible gold sugar or glitter, as done on these marshmallow s'mores to add some sparkle to your get-together. Edible glitter and crystal sugar can be found at most craft stores. Photo source here.
Drinks or snacks reflecting the nominated movies are always fun. The folks at Dobel Tequila came up with this wicked concoction, inspired by the tequila-induced sex scene from Black Swan! Go here for the recipe.
Remember this popcorn bar from Garnish I featured a while ago? Perfect for a night celebrating the movies! Use different toppings like cinnamon to jazz up your popcorn. Original post here.
Wednesday, January 12, 2011
Edible Panties

I can't wait to see how people find this post with that title! ha! These are edible panties, but of a way different kind! Aren't they hysterical?!
Even if you're not single, getting together with a few of your best gal pals is always a good idea... and Valentine's Day is giving you the excuse to get it together!
I always think of Valentine's Day, not as a day for couples, but as a day to show your appreciation for the people in your life, and a close girlfriend is priceless! So, team up with some good friends to enjoy some wine, sweets and laughs. These cookies, made by turning the hearts upside down, will add some fun to your party. I bet if you left out the squiggly details, these wouldn't be too hard to make. Make sure to share the photos!
Photo source here.
Tuesday, January 11, 2011
DIY Frosted Mason Jars
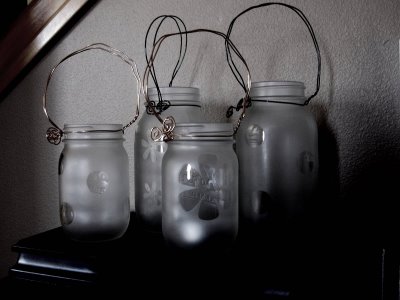 After yesterday's winter warmer party, I was motivated to find a cute project that you can use for a winter themed party or as a decoration around the home. I came across this adorable frosted mason jar project. I love the different designs used. Hang them from white-sprayed branches for a party or display them in clusters with tea lights as done here.
 Click here for the complete tutorial.
Monday, January 10, 2011
Merry Monday: Winter Warmer Party
I was so afraid of getting the post-holiday, winter blues, but parties like this certainly help me to get over them–quickly! What better way to keep your spirits up, hold on to some decorations around the house and just get some friends together than a "Winter Warmer" party? What I love about this party is that it offers ideas you can individually use, like the hot chocolate mixing station. Coupled with some yummy biscotti–use it for a girls cozy get-together.
The beautiful party is a collaboration between Bird of Bird Crafts–who did all the printables you see–and Smita from The Party Wall, who did the styling. These party photos are sure to warm you up! Visit Bird Crafts here or The Party Wall here to see more photos. And if you'd like to host your own Winter Warmer party, Bird Crafts has made the printables available in her shop here.


Friday, January 7, 2011
Please Sir, Can I Have Some S'Mores??
Not quite the exact quote from Oliver, but that's what my girls sounded like when they asked for s'mores New Year's Eve. I was surprised by the request, since the last time we made s'mores was over the summer. But, I was certainly happy to oblige and just used my oven to make them. The girls also reminded me that s'mores are not just for summer and there are so many ways to enjoy them. Perfect for an indoor camping or winter-theme party, here are a few great options when you don't have an open fire available. And no matter what form they're in they always seem to put a smile on people's faces–no matter their age! I definitely had my fair share with the girls!
 Left: Seems like everything was being put on a stick in 2010, and s'mores were no exception! Easy to make, they are still a cute treat! Find the how-to here.
 Left: If you think that cupcake looks good on the outside, wait until you see the inside! To see what the surprise middle is, click here.

Right: How adorable and fun are these? And still perfect for the season! Visit here to find out how to put them together.

Right: A great way to eat s'mores anytime of the year! These bars are right up my alley! Click here for the recipe.
Thursday, January 6, 2011
A Rad Mag Party
With so many people talking about their new year resolutions, I couldn't wait until "Merry Monday" to post this party. Seems like "spend less", "budget better", "be more green" are common goals, especially if you often play the hostess. Regularly hosting parties can become quite expensive and that's why it's important to re-use what you have or find creative ways to save money... enter this party!
This was a New Year's Eve party done by Sharon of Cupcakes & Cutlery and Lauren of A Fabulous Fete. Get this–the favors, party blowers and ALL the decorations were made using the pages of Real Simple magazine. And everything looks GREAT! Look at the amazing things they came up with!


Yes, cutting circles, etc for these projects will take you some time, but plan ahead, do it gradually in front of the TV, and the time will pass. The money you save will be totally worth it, and imagine what a great conversation maker just your decorations will be for your guests! 


Wednesday, January 5, 2011
DIY Crackled Birdhouse
The crackled finish of the birdhouses in the Love Birds tablescape added a nice, rustic look to the overall design. It's a look that is so easy to achieve because the paint does all the work for you. So, this tutorial is more about what I used to get the crackled finish, than actually how to do it.
First you need a sealer and crackle paint. I used DecoArt Primer-Sealer and DecoArt Texture Crackle. Shown below. Both were purchased at Michael's.


 Finally, I cut triangles from scrapbook paper to size to cover the roof. I glued those on with a thin coat of Elmer's glue. And that's it! I perched them on top of candle holders that I trimmed with lace for the table.
Tuesday, January 4, 2011
DIY Doily Cupcake Wrappers
 Did you notice the elegant cupcake wrappers on the Love Birds table yesterday? So pretty, you can make them for an engagement party, shower, winter-themed party or other special occasion. And they are so simple to make! All you need is:
- 10" paper doilies (silver doilies will give you a nice vintage look)
- scissors
- transparent tape (not magic tape)
 Wrappers are an easy way to dress up a homemade cupcake, and a smart way to cover burned bottoms!
Participating in the following link parties
Monday, January 3, 2011
Merry Monday: Love Birds Tablescape
Happy New Year! I am so excited for this upcoming year! As much as I don't like to formally make resolutions, I do look at the new year as an opportunity for a fresh start. And I certainly hope this is the start of great things to come for Home Confetti! You may have already noticed that the top of the blog looks a little different... I'm official–Home Confetti has a logo! Pretty snazzy, eh?? And the year is already off to a great start! In case you missed it, my Love Birds tablescape was featured on Pizzazzerie last week (see here). I was so super excited! Pizzazzerie is one of my top "go-to" sites when it comes to party inspiration, and the women behind Pizzazzerie–Courtney, Crista and Katie–are incredibly nice and supportive. Here are some of the photos of the tablescape.


Those who personally know me, know that I have been playing with the idea of turning Home Confetti into an actual business. It's just a matter of figuring out how to make it appealling for the area I live in, and really just how to execute it. WELL... this Love Birds tablescape is my first attempt into the party planning business. I started with this theme because it's pretty relevant to the season–so many engagements happen on Christmas and Valentine's Day. And birdies themselves are such a popular theme. The tablescape is perfect for an engagement party, bridal shower and even a girly baby shower (A little birdie told me...") It will be offered as a pre-designed tablescape, but it's flexible enough to customize and personalize with signage, cupcake toppers, and more.
I will be giving you the DIY on the cupcake wrappers and birdhouse in the next couple of days–so stay tuned!
Subscribe to:
Posts (Atom)